-
30 December 2010
DDS deadline met
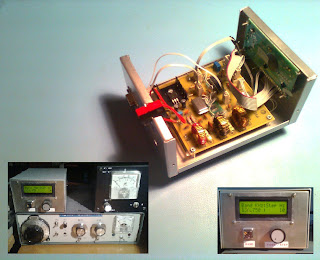
I have completed the first prototype of the dual-band frequency synthesiser, ( just before my self imposed deadline of the end of the decade ), by writing the last piece of the software to tune the output frequency up and down in 1Hz or 10Hz steps. This function works perfectly; whatever the actual output frequency, it precisely matches the frequency indicated on the display, as of course it should do. So 2010 will end on that happy note. But what about the future ?
This first prototype is what I would consider as a ' concept and technology demonstrator'. For the second prototype synthesiser I have decided to change to a more sophisticated PIC microcontroller, and one that has not been in production all that long, e.g., the Microchip PIC18F4550, which will allow me to implement more features. In fact I have already completed about 25% of this prototype , based on "MyDev2"; see posting on 2nd November.
Concerning software, until now I have been programming in Microchip's assembler language. Using 'C' language is probably a better choice in future. I have absolutely no prior experience of 'C'; but what I do know is that its command syntax is more descriptive than assembler, and the code is not type specific to any one manufacturer's microprocessor families. Some of the extended functionality I want for the second prototype is better suited to 'C' and would be extremely difficult to program in assembler for a novice programmer as myself. The PIC18F4550 can be programmed in both assembler and 'C'.
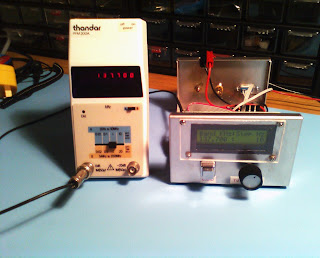
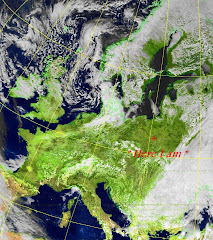
Back to the present, and the first prototype is shown in the upper picture placed on top of my longwave transmitter with which it will be used to gain some operational experience which may suggest improvements or further development. The middle picture is the post-filter rf output voltage displayed on an oscilloscope, showing a 656mV peak-peak pure sine wave. The lower picture is the output frequency of the synthesiser as I tune it from 137700Hz +/- 50Hz in 10Hz steps.
24 December 2010
Stepping up and stepping down
A few hours ago I took my frequency synthesiser project a significant step nearer to completion. I had a 'eureka' moment; not actually in the bath but instead while waiting to go Christmas shopping with my daughter.
A long time ago I had programmed the PIC microcontroller to show the frequency on the liquid crystal display. The number crunching sequences needed are binary to binary coded decimal ( bcd ) conversion, bcd to ascii, and finally, supression of any leading zeros to prepare the number for display.
For weeks I had been baffled why I couldn't achieve this repetitively in order to step the displayed frequency up or down in response to clockwise or counter-clockwise turning of the rotary encoder; the only difference being to include multiple byte addition and subtraction. This I have now managed to do. It's a great result for me and so good to see on the display. Now I can enjoy Christmas and not be distracted by searching for a solution any more.
This was one of the last two crucial issues to be resolved; the other being to increment / decrement the tuning word by the same step size for sending to the synthesiser chip, which should be straightforward. So I ought to be able to complete the prototype frequency synthesiser this month - famous last words !
08 December 2010
XiWANG - Chinese for hope
I had my first radio contact using a satellite as a repeater in 1997, and since then have made a total of 582; an average of less than 45 per year. So I have not been very busy using satellites which have to compete for my time with my many other amateur radio operating interests and construction projects. It usually needs the launch of a new satellite to get me interested again. Such was the case recently when China launched its first amateur radio communications satellite, called XiWang-1, ( Hope-1 ), on 15th December 2009.
Commissioning of this satellite finished in early September 2010, when it was then brought into operational service, using the broadcast callsign BJ1SA-11 and message board callsign BJ1SA-12 with uplink in the 145MHz band and downlink in the 435MHz band. Soon afterwards, I began listening to its beacon transmission in morse code and decoding its data signal, for example,
BJ1SA-11 To DL8DR [21:07:48]
OK DL8DR\\D
BJ1SA-12 To BBSTAT [21:08:05]
Open BJ1SA-12:1
BJ1SA-12 To OZ7SAT [21:08:15]
BJ1SA-11 To PBLIST [21:08:28]
PB: DL8DR\\D
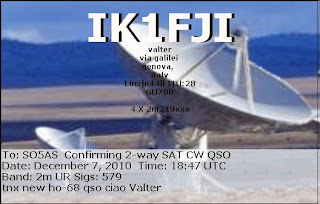
This week I have enjoyed making my first two-way radio contacts through this "bird"; so far with other amateur radio stations in Italy, Norway, France, Belgium and Hungary. I have already received a radio contact confirmation card from one of them.
The antennas I am using are crossed dipoles, ( uplink ), and helical, ( downlink ); both are home-made and can be seen in the picture which I posted on 11th May.
PS. 11th December. After my initial euphoria my enthusiasm has been dampened by the fact that the cw/ssb transponder seems to be turned off for long periods.
Commissioning of this satellite finished in early September 2010, when it was then brought into operational service, using the broadcast callsign BJ1SA-11 and message board callsign BJ1SA-12 with uplink in the 145MHz band and downlink in the 435MHz band. Soon afterwards, I began listening to its beacon transmission in morse code and decoding its data signal, for example,
BJ1SA-11 To DL8DR [21:07:48]
OK DL8DR\\D
BJ1SA-12 To BBSTAT [21:08:05]
Open BJ1SA-12:1
BJ1SA-12 To OZ7SAT [21:08:15]
BJ1SA-11 To PBLIST [21:08:28]
PB: DL8DR\\D
29 November 2010
Four on longwave
Most weekends, except in summer, I am transmitting my radio signal on longwave, ( 2190m / 137.7KHz ), and hoping someone will reply. Usually my signal goes unanswered as no one else is about; but last night Marek, a Polish radio amateur, callsign SP2OVY, from near Gdansk, called me. I had never received his signal before. So I assume that he has only recently begun to transmit on longwave. To my knowledge there are now 4 Polish stations, including myself, who have transmitters for the 2190m band; though I am aware of a few others who monitor on receive only. Two years ago I was the only one active on longwave in Poland. So the numbers are gradually increasing.
The distance between Marek and me is only 277kms; but I was happy my signal made it that far as snow on my antenna had significantly detuned it. We had a successful 2-way contact, ( report "O" bothways ), ending in the early hours of this morning.
The screen capture shows his slow morse ( QRSS ) signal to which I have added the letters; of course 'E' and 'N' were the following two letters on the next screen capture, ( not shown ).
I am still using the same home-made transmitter and antenna which I featured on the blog on 25th January and 19th February.
23 November 2010
Adjustable voltage for the ex-PC PSU
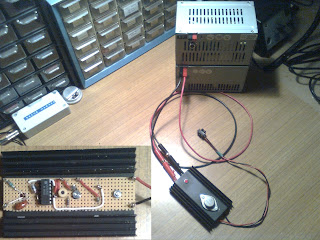
The discarded computer power supplies which I modified, ( see January 26th and March 7th ), are very useful items of equiment to have on the bench in the workshop; 12V for my frequency synthesiser project and 5V for microcontrollers. They are, of course, fixed voltage supplies. There will be times when other voltages will be needed. I am thinking in particular about 9V and 3V. So I made an adjustable series voltage regulator to connect externally to the 12V power supply. The regulator uses a linear voltage regulator IC, RCA type CA723CE, or National Semiconductor type uA723CN; both have identical pin assignments, and are directly interchangeable, ( same package outline 14pin DIP ). Unfortunately two different, separate circuits are needed to provide 3V and 9V; the difference being the connections between the resistive potential divider and the error, ( "long-tailed pair" differential ), amplifier. For the time being at least, I decided to make just a 9V version for permanent use, ( the output voltage is adjustable between 8.43 - 9.81V ); but I also built a 3V version on experimenting board to check it, ( the output voltage range was 2.8 - 3.6V ).
The xA723Cx IC on its own can provide a maximum of 150mA output load current. This is insufficient for general purpose use on the work-bench; more current should be available. So the IC drives a 'pass' transistor rather than the load directly; but the output will be 0.6V less. Just about any power switching transistor capable of passing a few amps is suitable. From my stock I pressed into service an ancient and hitherto unused Motorola type BU326A, rated at maximum 8A, and fitted it to a small 2.9degC/W heatsink.
The xA723Cx IC on its own can provide a maximum of 150mA output load current. This is insufficient for general purpose use on the work-bench; more current should be available. So the IC drives a 'pass' transistor rather than the load directly; but the output will be 0.6V less. Just about any power switching transistor capable of passing a few amps is suitable. From my stock I pressed into service an ancient and hitherto unused Motorola type BU326A, rated at maximum 8A, and fitted it to a small 2.9degC/W heatsink.
18 November 2010
AF Marker Generator
I have four 2048KHz quartz crystals, probably originally in some old 32 channel PCM telecomms equipment, and was thinking how I might use them, or at least one of them. I also have the same number of CMOS logic binary divider ICs, types HCF4060BEY and CD4060BE. 2048 = 2e11; dividing it by 2e12 ( 4096 ) will produce a 0.5KHz square-wave from the divider chip.
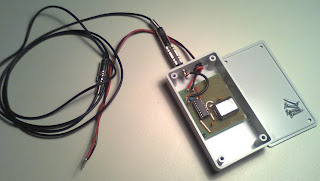
In my circuit, the crystal is used in a 2048KHz oscillator to clock the divider chip and the 0.5KHz square-wave is taken from the /4096 output on pin 1. A resistive potential divider reduces the level of the square-wave to 1.05V on the output phono socket.
As a square-wave is the sum of harmonically related sine waves, in the frequency domain there will the fundamental 0.5KHz signal and its odd numbered harmonics; 3rd, 5th, 7th, 9th etc. For my purposes the most useful signals are the fundamental, 3rd and 5th harmonics; 0.5KHz, 1.5KHz and 2.5KHz respectively, as these lie within the AF band 300Hz-2.7KHz typically used in radio communication, and can be used as accurate frequency calibration markers.
I have connected the marker generator to the sound card in one of my PCs in order to display the audio spectrum. With the cursor arrow placed as accurately as I can manage on any one of the signals, e.g. the 3rd harmonic near the band centre, and reading off the frequency there is a frequency error of +7Hz due to the inaccuracy, compared with the nominal, of the sampling rate of the sound card input.
After that slight digression I had better get back to PIC programming, or maybe I'll make a start on putting together the pre-amplifier, ( see June 16th ).
08 November 2010
On display
Seeing is believing ! I programmed the frequency synthesiser, which I am in the process of building, for an output signal on 137.700KHz. Both the display on the Thandar PFM200A frequency counter, ( connected to the output ), and the display on the synthesiser, ( connected to the microprocessor ), agree. What a relief.
The next task is to make it tuneable up and down, ( probably in 1 and 10Hz steps ), implement band changing and at the same time make sure the display updates correctly.
The next task is to make it tuneable up and down, ( probably in 1 and 10Hz steps ), implement band changing and at the same time make sure the display updates correctly.
02 November 2010
MyDev2 replaces MyDev1
 |
| PIC18F4550 version |
 |
| PIC18F4685 version |
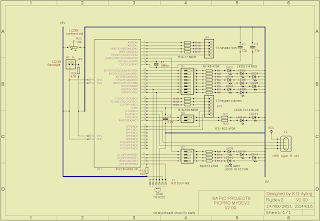 |
| Schematic - note Vcc connection depends on usb-powered or self-powered application |
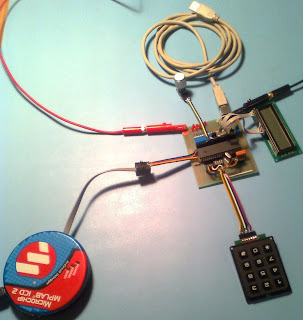
"MyDev2" connects to the Microchip ICD2, ( In-Circuit Debugger No.2 ), for programming and debugging operations, thereby replacing my original home-made programmer, ( see 25th Jan, 8:06PM, purple box ).
Using a development board I was easily able to change between two mechanical rotary shaft encoders, ( control with knob ), from different manufacturers, choose the more appropriate one for my final application, and 'fine-tune' the PIC code to suit.
Incidentally, the microcontrollers featured in the pictures above are 40 pin Microchip parts, ( lower ) type PIC18F4685-E/P, and ( upper ) type PIC18F4550-I/P which incorporates a USB interface.
17 September 2010
SMD soldering success
I have used the tools and materials described in my posting on 20th August to solder successfully in place the frequency synthesiser chip, ( encircled in the picture ); an amazing result, considering it was the first SMT component I had ever attempted to solder, ( since being properly equipped ), and I had only 'perfected' my technique on a scrap piece of circuit board a few moments earlier !
The chip is Analog Devices Inc. 50MHz CMOS complete direct digital synthesiser type AD9835 which measures 5.1mm x 4.5mm and has 8 connection pins on each of the two longer sides to be soldered.
The mixture of 'through hole mounted' components and SMD on the same board is convenient and acceptable for prototyping. With this first SMD soldering success behind me I shall, in time, convert the circuit board completely to SMT in a future version.
Now let me see if the code I have written, ( see 17th May ), to control the chip will actually get it to do what I want.
13 September 2010
Matchbox
During the summer I don't operate my amateur radio station on the low frequency bands, ( 80m, 160m and 2190m wavelengths ); the atmospheric noise, mostly from thunderstorms within a radius of about 4000kms from me, just doesn't give a pleasant listening experience, as well as blotting out the weak signals which I need to hear. Conditions in winter for radio communication on these bands are much better, particularly for making very long distance contacts. My favourite time for concentrating on these bands is around the time of the autumn and spring equinoxes. I am starting to get excited as such conditions will soon be arriving again.
I use the same antenna on each band, namely a vertical, aluminium pole which rests on an insulator at its base. Over the years I have collected many useful insulators of this type, both ceramic and glass, by looking on the ground at the bottom of telephone poles.
I have just cleaned the insulator, ( a white, ceramic one ), checked and weather-proofed the connections to the antenna, confirmed that it is resonant on my preferred frequencies and impedance-matched to the 50 Ohm coaxial feeder cable from the transmitters.
The matching networks, ( a tapped coil for the 80m band, a L-C 'L' network for the 160m band ), are located inside the storage container with lid, otherwise known as the "Matchbox", at the foot of the antenna, with the exception of the loading coil for the 2190m band which is too large to fit inside.
Perhaps this year I will reach my target of making contact with 160 different countries on the 160m band.
20 August 2010
ESD and SMD
Many modern electronic components are vulnerable to electrostatic discharge, ESD, and may also be miniscule surface mount devices, SMD, ( typically with dimensions of only a few hundredths of an inch ), for circuit boards using surface mount technology, SMT. The synthesiser chip, which I referred to on 17th May, is both. Since then I have assembled the necessary tools, materials and aids to work successfully with such components.
On the heat-resistant anti-static work mat I've placed some other ESD accessories; wrist-strap, anti-static brush and earth plug.
For soldering and handling I have a 48 watt temperature controlled soldering iron, tips with sub-millimetre pointed ends, 0.38, 0.56 and 0.70mm diameter solder, solder-wick ( size AB ), liquid flux, solder paste, iso-propyle alcohol for cleaning off flux residue, tweezers and a swivel mounted vice. Regarding the vice, mine has a groove along the length of the jaws, making it ideal for holding circuit boards.
Obviously it is fundamental to be able to see the SMT components properly. So to help me in this regard, and also for inspecting my work, I've collected various types of optical aids, handheld and hands-free, with magnifications from x1.5 to x20. The adjustable 2.5 watt LED light will illuminate the work surface without too much glare or shadow.
All that is now left to chance is a steady hand !
06 July 2010
ISS and I-Gate


The International Space Station, ISS, has been very easy to see just after dusk for the last few evenings. The first module, called Unity, was placed in orbit in 1998.
About September 2005 I became registered as an authorised Internet Gateway, ( I-Gate ), for traffic relayed by the ISS, and seeing the ISS recently rekindled my interest. With my laptop connected simultaneously to a radio transceiver and the internet I can receive and pass on to an internet server messages, beacons, locations, and weather reports from ground-stations, sent via the ISS.
The first couple of lines of text show that I sent traffic to an address APRS via ARISS, ( the ISS ); the content is my ground-station location and a text string stating that it is an internet gateway, digital repeater and weather station. The next two lines show that 2 seconds later my transmission was relayed by the ISS, which inserted its callsign RS0ISS-4, and was received by me and any other ground-stations in range of the ISS at that time.
In lines 5 and 6, I sent a kind of greetings message to everyone, and again, 2 seconds later, receive it back. I have in the past sent personal messages to specific stations and weather, ( 'WX' ), reports; but on this occasion I didn't leave myself with enough time to download weather data from my weather station to the laptop, before the ISS was above the horizon.
It is not possible to 'I-Gate' ones own transmissions; another 'I-Gate' has to do that. My first transmission contained coordinates; so when an I-Gate in the Netherlands received it, I could then be plotted on the map. Look for the green star with 'D', meaning digital repeater. The station UT1HZM in the Ukraine appears on the map only thanks to me; I received and 'I-Gated' his transmission. A station in Belgium, using my email address, subsequently emailed me.
Quite a few stations were active during that particular ISS pass over Europe yesterday between 2139 and 2154 CET. Some of them, ( white 'WX' in a blue circle ), were transmitting weather reports.
All up and down link transmissions to and from the ISS took place on a frequency of 145.825MHz, +/- Doppler shift, with a data rate of 1200 bps, AX25 packet unprotocol information, ( UI ), frames. I used a 50 watt transmitter, TNC-2 terminal node controller with the TNC-laptop interface running at 9800bps, and 'white stick ' antenna; the software packages are AGW Packet Engine, UISS and UI-View.
Perhaps this evening I will send a weather report for all the world to see !
Click on the post title link for more information, the latest maps and traffic from the last two hours or so.
16 June 2010
Noise factors
Having achieved over the years considerable success with radio communication on the VHF bands using terrestrial modes of radio-signal propagation and reflecting my signals from the ionised trails formed by meteorites as they burn up in the earth's atmosphere, I am considering a new, formidable, challenge; reflecting my signals from the moon, to be able to contact amateur stations on the other side of the world on VHF. Signals received via the moon will be very weak, however, and at present noise may be a limiting factor. All radio signals are received in the presence of noise, from external atmospheric, man-made and galactic sources as well as that added by the receive equipment itself. Even an electronic component, such as a resistor, lying unconnected on the work-bench generates noise at the sub-atomic level, unless kept at a temperature of -273C ! Powered-up equipment at room-temperature is much noisier. I had been wondering if my equipment would be sensitive enough to receive signals reflected from the moon from other stations, as well as my own, or would they be buried under the noise and be undetectable.So I carried out an assessment of the noise performance of my VHF receive set-ups, for 50, 70 and 144MHz frequencies, and found it to be poor in each case. The noise is excessive for consistently successful 'moonbounce', though there is always the possibility of the occasional 'freak' contact. My assessment method, using my 144MHz set-up as the example, is shown in the upper picture.
I can't control external noise, but fortunately there is still a remedy; fit a low noise receive signal pre-amplifier as close to the antenna as possible. I set about designing one, first for 144MHz, based on a low noise n-channel dual gate mosfet transistor, type BF991, which is specified to 200MHz, ( circuit shown ). With a noise figure of 1.28dB and sufficient gain, this little amplifier should do nicely and allow a signal power of 1.306x10e-4 picowatts from the antenna to be detected with a signal / noise ratio of 10dB in a 2400Hz receiver bandwidth ! I will need to modify the circuit for the other two frequency bands mentioned, just by changing the attenuation of the 50 Ohm pad and the values of the frequency dependent components.
So three preamplifiers in all - my list of circuits to build during next winter just keeps growing !
12 May 2010
The 500 watt amplifier under cover
This is the same amplifier that I posted here on 25th January, and used to such good effect during my radio contacts with the Balkans mentioned yesterday. It occurred to me that if I am going to use it frequently, perhaps even every day, over the next few weeks, then I had better carry out some maintenance on it.
So today I disconnected it, removed its covers, cleaned the airways and checked that all the mechanical connections were secure. These can work loose in time owing to thermal cycling, and several needed further tightening.
With the bottom cover temporarily removed there was a rare opportunity, not to be missed, to take a picture. Pictures of the equipment I build are actually very useful to refer to if I want to make any changes, and are not just for blogging purposes of course.
To give an idea of the amplifier's size, it measures 50cm x 25cm x 25cm ( w x d x h ). Regarding it's weight; suffice to say that it's almost too heavy for me to carry !
11 May 2010
The metre wavebands - playtime on VHF
My VHF antennas have passed a visual inspection. They survived the ice and snow of winter remarkably well and are still intact. This is very fortunate because in spring and summer I devote more time to listening on the VHF bands in order not to miss the favourable atmospheric conditions, more frequent at this time of year, which allow greatly extended communication ranges on these wavelengths.
Such conditions occurred earlier today in a SSE direction, when I contacted numerous amateur radio stations on the 6 metre band, ( 50MHz ), upto 1840 kms away in southern Bulgaria and Greece.
20 April 2010
Iceland's volcanic plume


The plume of volcanic ash belching from the Eyjafjallajoekull volcano, ( 1666m ), in the Katla range is visible from space. It can just be seen on an image I received yesterday, 19th April at 1215gmt, from the NOAA 19 weather satellite on 137.10MHz.
At first I had almost overlooked it, believing, because of the enormous publicity the eruption had attracted, that from the satellite's viewpoint most of western Europe would be hidden from view under the ash cloud. A further series of images captured today from NOAA 15, 18 & 19 confirm the continued presence of the plume, but show it to be diminishing.
I shall be following the progress of the ash plume/cloud from space and post additional pictures if they are more distinctive.
Iceland is at the limit of my range from here for clear satellite reception; the satellite being only just above my horizon as Iceland comes into view !
17 April 2010
Full earth disc
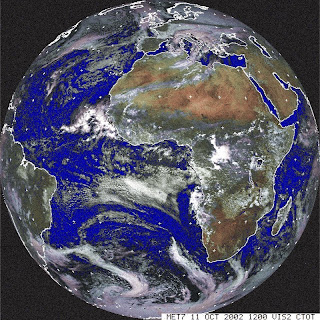
Previously posted weather satellite imagery has been from satellites in low earth orbit as they pass over above my horizon for upto 15mins every 100mins or so. For full earth disc pictures I had to receive the signals from satellites much further away in the geostationary orbit; in particular satellite Meteosat 7 at 0 deg. E. Using an 80cm satellite tv dish pointing in that direction, I had no problem receiving the analogue WEFAX imagery on 1691MHz. The last time was in 2002; it doesn't seem so, but I checked. That's a long time ago. How time flies !
Recently, I have been occasionally listening for Meteosat 7's transmissions again; but heard nothing. Has the satellite re-entered, or been parked into a graveyard orbit, I wondered. No, instead it has been moved to above the Indian Ocean.
More importantly, the analogue service ceased anyway probably early in 2004. I can't receive the new higher resolution digital service from Meteosat 9, Meteosat 7's replacement at 0 deg. E, without spending some money on equipment. I might not bother.
So, if in the future I don't receive any more full earth disc pics, I have posted one from my archive from 2002, and we just have to imagine the quality and resolution of the digital pics nowadays; or use the web, but that would be too easy.
16 April 2010
Sat pic gallery
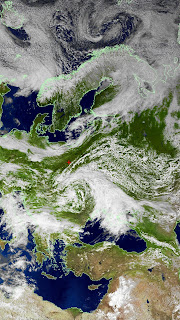


Today's images in the visible light band which I received "off-air" from the US National Oceanographic and Atmospheric Administration, ( NOAA ), low earth orbiting weather satellites, NOAA18 & NOAA19, automatic picture transmission, ( APT ), weather facsimilie, ( WEFAX ), service.
From top to bottom:-
NOAA19, 1104gmt, downlink 137.10MHz
NOAA18, 1141gmt, downlink 137.9125MHz
NOAA19, 1246gmt, downlink 137.10MHz
NOAA18, 1323gmt, downlink 137.9125MHz
There is still some sea-ice to be seen at the northern end of the Gulf of Bothnia.
If you look carefully you may see a red cross which gives away the position of my ground station.
15 April 2010
The changing seasons

It is interesting to follow the seasonal changes on earth from the images which I receive directly from weather satellites. The last time on 26th January, ( see post ), showed Europe from Germany eastwards under ice and snow. The images which I captured today tell a very different story.
The infra-red image I have chosen to post here was derived from the heat detected by the infra-red sensor onboard satellite NOAA18, and transmitted on 137.9125MHz at 1151gmt. Darker shades, ( black, brown, green ), represent warmer areas than lighter shades, ( blue, white ). Many Baltic countries had a fine, warm day today. I was outdoors making the most of it !
09 April 2010
Loopy thoughts
I've been sorting through my stock of coax cables. If I join together several lengths of the same thickness of 6mm, I could make one length of 70 metres. Perhaps it will be enough to construct a reasonably effective rectangular loop antenna for transmission on the longwave 2190m band.
So let's see.
I could support it vertically from two trees in the garden 20 metres apart, with the vertical plane running N-S. The area enclosed by the loop would be 300 square metres.
After doing some quick calculations, I predict Rrad = 121 micro Ohms, and efficiency = 0.0076%, assuming rf losses = 1.6 Ohms.
In terms of efficiency it will be nearly 4dB worse than my existing longwave Marconi antenna. Another limitation is the loop's bi-directionality, ( Marconi omni-directional ); so radiation broadside ( E-W ) could be 30dB down on end-fire direction ( N-S ).
I wonder if making it will be worth the effort.
Has anyone made a longwave loop antenna of a similar size ?
If so I would be pleased to hear of your experiences with it.
I won't be buying a single 70m length of new coax just yet !
08 April 2010
Antenna traps using coaxial cable
Traps are tuned circuits used in various types of antennas to allow multiband operation. They can be bought from commercial sources, or home-made with the advantage of low cost, ( almost nil ), and your choice of design frequency rather than the manufacturer's. Ever since I burnt out a bought trap, I have always made my own.
My preferred method is to use coaxial cable formed into a coil round plastic drain-pipe, and avoids using a high voltage capacitor as the self-capacitance of the cable tunes the coil to resonance. I have made lots in the past, several of which are currently incorporated into some of my antennas. For lowest loss traps, coax cable having the thickest inner conductor practicable should be chosen, unless the weight causes the antenna element to sag excessively.
The one I have just made is for a modification to improve my longwave antenna. It consists of 6mm diameter RG58C/U type coax cable round a 90mm diameter pipe. I easily tuned it to the precise frequency I wanted using a 'dip' oscillator, frequency meter and adjusting the spacing between the end turns of the coil. Then the turns were held in place by applying hot melt glue into the gaps.
02 April 2010
Spring cleaning
Every year at around this time I like to clean the inside of my fan-cooled amplifiers; suck out the dust, remove dead insects and spiders, and also clean the fans themselves. Over the course of a year's use a lot of dirt gets drawn in and accumulates. Cleaning should ensure reliable operation over the next 12 months.
My 150 watt VHF amplifier for 144MHz has its top cover removed prior to undergoing this treatment. It uses the American, Eimac type 4CX250B, ceramic, external anode, tetrode tube; also shown with its ceramic chimney alongside.
30 March 2010
Compliments always welcome
I have just received an unexpected email from Michal, a Polish radio amateur, callsign SQ7JZI, who has been monitoring my longwave transmissions recently. He wrote, " Incredible VLF signal to 137KHz, congratulations. What equipment do you use ?"
Of course I had to tell him, and encourage him to radiate his own signal. Then there will be 3 from Poland on the 2190m band.
Signals on this band are rare; still none at all from many of Poland's neighbouring countries. I hope someone from there will one day be able to change that. It would certainly add interest.
27 March 2010
Circuits

This evening I have been transmitting on longwave, waiting for a contact partner, but none appeared, although I know that my signal was being received in Nuernberg, Germany, 745 kms away.
While waiting, I realised that until now I had never placed on my blog a circuit diagram for any of my construction projects; and yet there might be some visitors who would like to copy some of my designs.
Although the picture can be enlarged by clicking on it, whether I do this again still depends on the clarity.
Anyway, I try it at least once, with the circuit schematic of my GS31B 50MHz amplifier from 4 years ago. ( see also 25th January 2010 ).
24 March 2010
My Russian toys
Though not dolls, there is nevertheless a progressive increase in size.
They are Russian made high power triode tubes, ( thermionic vacuum tubes, valves ), ideal for use in VHF/UHF transmitter power amplifiers, and significantly cheaper than western alternatives.
So, from L - R, the ones I have are type GI46B, GS31B and GS35B; in each case the suffix 'B' denotes tube variant suitable for forced air cooling, with or without the finned anode cooler. ( An 'A' here would mean water-cooled ).
The GS31B is a spare in case the one in my 50MHz amplifier, ( see post of 25th Jan, 7.23pm ), fails one day.
I am currently building an amplifier for 144MHz using the GS35B.
I haven't decided what to use the GI46B for yet. If I can obtain a second one, then making an amplifier for 432MHz using both tubes with their outputs combined would be an interesting construction project.
20 March 2010
International Space Station

I was sitting in my radio room while wondering what to do next when I saw a radio contact confirmation card on the wall. Perhaps because it has been there a long time, I rarely notice it. As it may be of interest to the many visitors to my blog, I have put it here. The card shows the International Space Station, ISS, of course, and was sent to me as a memento of a conversation I had with Bill McArthur, the Mission 11 (?) commander, as the ISS passed over on 27th November 2005 at 11.00am.
I guess the ISS has grown in size since then !
18 March 2010
Frequency synthesiser
Having decided on all the additional functions I want, ( band change, tuning step selection, PTT and output filter ), and the switches and connections that will be needed, during the last few days I have progressed further with the frequency synthesiser project from the experimental and development stage, ( see 25th January ), to the first, ( boxed ), prototype. The green, back-lit, dot-matrix liquid crystal display gives a particularly pleasing appearance. The source code still needs some refining. The inset shows new code being uploaded via the 'in-circuit serial programming' interface, ICSP.
13 March 2010
Weather bad, longwave good
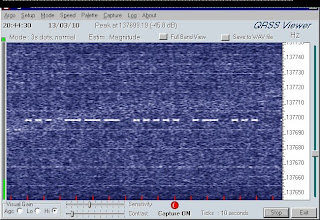
Tonight it is snowing again. The large coil is outside and connected to my antenna, but has little protection from precipitation. Although the weather is poor, radio propagation conditions on longwave tonight have been good. I have just completed a contact with Gerhard in Austria. The screen shot shows him calling me at the start. The other horizontal lines are sidebands from the LORAN-C navigational system on 100KHz. There are LORAN-C sites in coastal regions of northern Europe. We have to put up with its interference until the system is supersceded by GPS. The sound it makes is like a steam locomotive travelling at 100mph. To our advantage, however, these 'lines' give a useful indication of propagation conditions on 136KHz, and were strong and clear tonight; hence the possibility for my contact with Gerhard.
My signal was also picked up 745 kms away in Nuernberg, Germany !
11 March 2010
Home-made PCBs
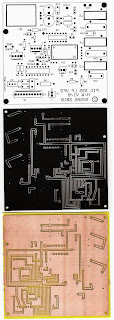
I made a printed circuit board, (PCB), today as part of the same construction project reported on 25th January. The quality achieved when making ones own boards in the kitchen at home can be remarkably high. I use silkscreen printing and photographic methods of production depending on the nature of the board. If I need a copper ground plane, (as in this case today), in order to equalise earth currents because radio-frequency signals will be present, I adopt the photographic method. If there are only to be tracks present, then the silkscreen printing method is quicker.
The picture shows the silkscreen layer, (top), for component locations, then the track pattern, (mid), and finally the etched board ready for drilling and populating. Click on the picture to enlarge it.
07 March 2010
Modifying PC PSUs - finishing off
Recently my electronics workshop in the cellar has become just warm enough to visit to complete the modifications. Since the posting on 26th January, I have chosen to use 30 Amp Anderson Powerpole connectors for the red/black 12V output terminals; fitting a LED 'power-on' indicator and non-slip rubber feet underneath completes the work.
( Thanks Richard for donating the original. )
27 February 2010
Friday night activity night

Yesterday evening the first activity period on longwave took place, to encourage Polish radio amateurs with longwave receiving and/or transmitting equipment to meet up "on the air". I think that in Poland only myself and one other guy can transmit on 2190m wavelength. Amateurs' antennas for this wavelength are relatively short and inefficient. So we have to transmit information slowly in a very narrow bandwidth to have any chance of being picked up. As an example, the screen capture shows how my slow morse signal, ( 4 sec dot , 12 sec dash ), was received by another Polish receiving station during this activity period.
19 February 2010
Extreme loading coil appears in ham press
A description and picture featuring the massive loading coil I use with my Marconi antenna for 136KHz, have recently appeared in RadCom, the monthly magazine of the Radio Society of Great Britain, RSGB, December 2009, page 29. ( click on the post title to visit the RSGB web site ).
The main winding consists of about 400 turns on a 15cm diameter, 108cm long, sewer pipe and has multiple tapping points. The rotatable variometer winding inside is made from 37 turns on a 11cm diameter plastic water-pipe. The upturned plastic food container on top keeps water out.
The impedance matching network to the 50 Ohm coaxial cable feeder from the transmitter uses an ETD44 transformer core with a 9 turn primary winding and a 20 turn secondary winding. I can obtain a perfect match with this method, though occasionally there is slight detuning of the antenna system owing to environmental effects, requiring readjustment of the variometer.
06 February 2010
Award arrives
27 January 2010
136KHz Award
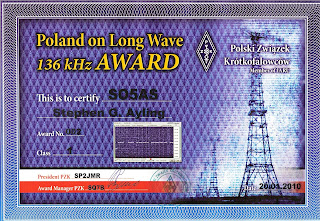
PZK, the Polish national amateur radio society, has awarded me with a certificate in recognition of my achievements in longwave radio communication. And I even get a mention on the PZK web site http://www.awards.pzk.org.pl
( click on post title )
( click on post title )
26 January 2010
Putting old computer power supplies to good use
ATX type switching power supplies which have been removed from redundant computers can be easily modified to provide useful +/-5V and +/-12V ( also not so useful +3.3V ) DC fan-cooled bench supplies delivering around 300 watts in total. Voltage regulation of all rails is controlled by the regulation of the +5V rail, which needs to be permanently loaded with a resistor of about 10 Ohms rated at 3 to 5 watts. The power unit I am modifying is almost complete; just needs some nice red and black output terminals to be fitted and then it's ready to take its place on the workbench.
25 January 2010
Amplifier for 144MHz
Another project on the bench is a transmitter power amplifier for the 144MHz band based on the Russian ex-military GS35 triode tube, ( centre top ), and which should be capable of an output in the region of 700 watts. The bias board ( right ) is completed, as is the control and switching board, ( left ); but the project is on hold. Despite my great endeavours, I cannot locate a source for the needed 2000 volt, 2 KVA eht transformer !
New design in progress
This is my current project which is still at the very early stages of development. I am hoping that eventually it will become a frequency synthesiser. For the first time I am using a programmable integrated circuit, PIC, which is basically a microprocessor using a reduced instruction set of around 40 commands. I am writing and testing the source code, burning the PIC, rewriting and retesting etc. Keep a look-out for future progress reports.
Winter at the antenna farm
Subscribe to:
Posts (Atom)
